It’s best to wait at least 24 to 48 hours after tiling before grouting the tiles since the mortar used to bind tiles to the surface must cure first. Allow adequate time for the mortar to cure before grouting.
Grouting too quickly may disrupt the tiles, resulting in additional complications and effort.
You should wait for at least 24 hours for tiles to set before grouting. This is enough time for the thinset mortar to cure and fuse to the tiles and floor fully. Wait for more than 24 hours before grouting tiles in cold or humid areas since thinset cures and fuses slower here.
The amount of time it takes for the mortar to dry is determined by its solution, temperature, humidity, and the mortar thickness put under the tiles.
How long should tiles set before grouting?
Allow at least 24 hours for the thin-set mortar to dry before grouting during tile installation. Curing for 48 – 72 hours is best, especially if the temperature is below 70°F (21°C) or working in a humid area.
Your tiles may not correctly attach to the surface if you grout before the tile glue has fully set, resulting in tiles falling loose, whether tiling floors or walls, indoors or out.
Adding grout before your thin-set mortar is cured may disrupt the curing process. This will cause the tiles to pop off the floor or wall and broken tiles.
Furthermore, moisture in the mortar may interfere with the grout’s drying process, resulting in discolored grout in some spots.
Thinset that hasn’t been cured behaves in unexpected ways. A tile might break loose and take some thinset with it. After that, you’re left with a worthless tile and a floor with a hardened thin-set glued to it.
Replacing tiles and scraping old mortar from the floor before a reapplication is costly and time-consuming.
It’s advisable to wait more than 24 hours before grouting your newly laid tile. You can leave your mortar to dry for as long as you like before grouting as long as the tile surface is maintained clean and debris is kept from the seams between tiles.
There are no drawbacks to waiting longer to grout. However, grouting too soon is a bad idea.
Which comes first: tiling the shower floor or shower walls?
According to the tile installation concept, the tiled wall ‘hangs’ over the tiled floor. The simplest method to get this effect is to tile the bathroom floor first so the wall tile appears to be ‘sitting’ on it.
Despite this rationale, some expert designers are against tiling the shower floor first. The main reason is that tile and mortar will almost always fall on the floor when tiling the wall. As a result, your floor may be damaged, and your bath renovation may take longer and cost more money in tiling and other areas.
If you insist on tiling the floor first, you can avoid such problems by covering your tiled floor with a protective cloth or tile-sensitive material while working on the wall. Remember that the tile mortar on the floor must completely dry before you can stand on it to tile the wall.
Can you grout tiles on the same day?
Before grouting, let the applied mortar dry completely. Allowing the thinset to dry entirely before grouting ensures that the alignment of the tiles is not disrupted when pressure is applied.
Grouting the tiles before the mortar has dried also seals the air the mortar needs to cure.
It’s vital to remember that while the thinset area at the margins may appear to be dry, the tiles’ product may still be wet. As a result, tiling and grouting on the same day are not recommended.
To guarantee that the newly placed tiles are completely dry, you must wait at least 24 hours before grouting.
How to grout after tiling
After tiling, grouting is a vital part that must be done carefully. The attractiveness of the tiles is enhanced by proper grouting. However, it may destroy your beautiful tile finish if not done correctly.
Here’s a step-by-step instruction to help you grout the tiles accurately and efficiently to complete your tiling project:
Step 1: Clean joints
With the assistance of a putty knife, clean the grout joints and lines. Scrape any protruding mortar from the grout lines and vacuum the gaps between the tiles. Remove any dirt or dust from the grout lines.
When cleaning the joints, be cautious not to damage the tiles’ surface. If you scrape too hard, the tiles will chip off -tape off the tile surface for simpler cleansing, particularly those with imprinted patterns.
Step 2: Mix your grout
Grout is often sold as a powder. To make a grout solution, add water and mix it thoroughly. Use a margin trowel to mix the grout until it is completely free of particles and the powder is completely dissolved.
Roll the bucket regularly when mixing the grout and scrape the bottom to ensure that all grout is blended.
Step 3: Load it on the float
The prepared grout should be loaded onto the float. This is a simple procedure, although it may be inconvenient if the grout mixture spreads across the floor while being scooped onto the float.
To avoid any issues, tilt the bucket towards you and drag some grout mixture up to the bucket, where you may scoop it. This makes it easy to shovel the grout onto the float.
Any extra grout will fall into the bucket rather than on the floor if you keep the float firmly against the bucket’s side.
Step 4: Spread the grout all over your tiles
To prevent dropping grout on the floor, apply the grout in upward strokes over the tiles. Let the grout penetrate the joints by diagonally moving the float over the tile.
Always grout the walls before the floor to avoid damaging the completed flooring. Using the float side to drive the grout deep into the joints is also beneficial.
Step 5: Remove any excess grout
Move the float side at a 90-degree angle with the tiles to remove any excess grout. This prevents the float from digging into the joints and allows the grout to flow evenly across the joints.
You must remove as much extra grout from the tile’s face as possible. You may squeeze off the grout by moving the float serpentine to make this procedure more efficient.
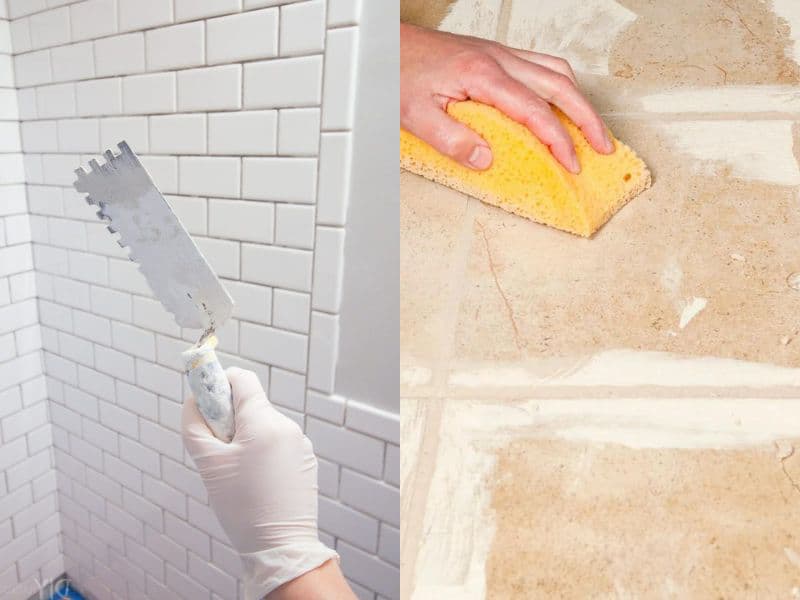
Step 6: Clean the tile surface
I recommend cleaning the tile surface with a moist sponge after removing excess grout.
Sponge diagonally over the tile after each rinse. Clean the cover until just a slight haze of grout remains.
The grout will appear to spread on the tiles on the first few passes, but don’t panic; rinse the sponge with clean water and continue cleaning. The extra grout will eventually be removed, leaving only a thin haze behind.
Step 7: Shape your grout lines
You can shape the grout lines and remove any uneven grout by rubbing the sponge with your index finger. Avoid pushing too hard because the purpose is to make the grout equal and at the same depth, not to remove it.
Step 8: Buff your grout haze out
The final step in grouting is to use a microfiber towel or cheesecloth to buff off the thin layer of grout haze.
After shaping the grout, wait half an hour before polishing the haze. You can then seal it off after that.
Is curing the same as setting?
When the concrete has strengthened to the point that it can withstand some pressure without breaking, it is said to have set. Walking on the slab without leaving tracks is a frequent example.
When concrete achieves its maximum strength, it is said to have cured. The material is now as solid as ever, and it should be able to sustain whatever weight it was meant to support.
Depending on the circumstances, concrete might be set in less than 2 hours or approximately 20 hours. Although concrete strength tests are done after 28 days, final curing takes several weeks. Temperature and humidity are other factors in this process.
Tile grouting tips and precautions
Some of the do’s and don’ts for grouting include:
| Do’s | Don’ts |
| Clean up before starting | Apply too much grout at once |
| Allow grout slacking | Clean immediately after grouting |
| Fill the joints properly | |
| Remove grout from corners | |
| Start from a corner outwards | |
| Apply a sealer |
Do’s
- Clean everything before you begin, and remove any dirt and stains before starting your project.
- After mixing your grout, let it sit for 10 to 15 minutes, which is called slacking. This allows you to assess your paint and see the correct texture.
- Check to see if the joints are filled. You may use a float to force the grout into the joints. Remove any excess grout from the tile’s face after filling the joints.
- Before caulking, remove the grout from all of the corners. Use a utility knife to remove grout from hard-to-reach locations.
Don’ts
- Don’t apply too much grout at once while applying it. This prevents the grout from hardening before it can be worked into the joints. Working in little 3×3 sections at a time is ideal.
- After you’ve grouted your tiles, don’t clean them immediately away. Allow the extra grout to cure before removing it.
These tips enable you to grout your bathroom tiles without issues. Tiles in bathrooms with toilets can be a bit complex to work with. However, with the correct toilet placement, you can avoid such issues.
Conclusion
Even though grouting is a primary method, sloppy grouting work will detract from the final appearance of your project. That is why it is critical to apply tile grout correctly.
Always read the manufacturer’s directions to ensure you grout your tiles appropriately. We hope the step-by-step tutorial in this article has shown you how to grout your tiles like an expert.
References
The University of Georgia. Laying a Tile Floor.
The Evergreen State College. Tiling Conformed Construction Set.
Michigan State University. Ceramic Tiling.