Recall all the times you tried flushing your toilet and were forced to flush it more than once to get the waste away? This can be a frustrating and unrewarding experience, all due to a low flushing power. From my experience in the plumbing field and from interactions with experts on the same, increasing your toilet’s flushing power is quite easy.
To increase the toilet flush power, clear clogs, increase cistern water levels, clean the bowl jet holes, open valves, adjust the flapper, unlock the pipes, and remove water from the floater. Low flush power is due to clogs, faulty toilet flappers, closed valves, low water levels, and blocked pipes.
With toilets using about 27% of all the water used in a household, you should be careful not to allow too much water per flush in the toilet. Luckily, toilets have the right amount of water needed per flush marked in the toilet tanks.
How to Increase Toilet Flush Power
Here are different helpful ways of increasing your toilet flush pressure:
| Causes | Fixes |
| Clogs | Clear clogs |
| Low water level in the toilet cistern | Increase water levels in the cistern |
| Clogged toilet bowl flush holes | Unclog toilet bowl flush holes |
| Clogged inlet valves | Unclog inlet valves |
| Poorly adjusted toilet flapper | Tighten or loosen the flapper |
| Clogged pipes | Unclog pipes |
Inspect and Clear Clogs
If you identify any unusual flush power with your toilet, you should first check out for clogs. Your toilet should take less than two minutes to flush all waste and refill the cistern.
In case it takes longer than that, it has a problem. A toilet generally uses gravity to siphon all waste and water out. Clogging of the siphon can alter how water enters and leaves the bowl.
To identify whether your toilet has a partial clog that alters its flushing power, pour a gallon of water into the toilet bowl to see if it will flush. If it flushes at a slow rate or flushes after a long time, chances are you have a clog. The best way of clearing the clog is to use a plunger or toilet snake. If you have neither of them, you can make your own DIY toilet snake.
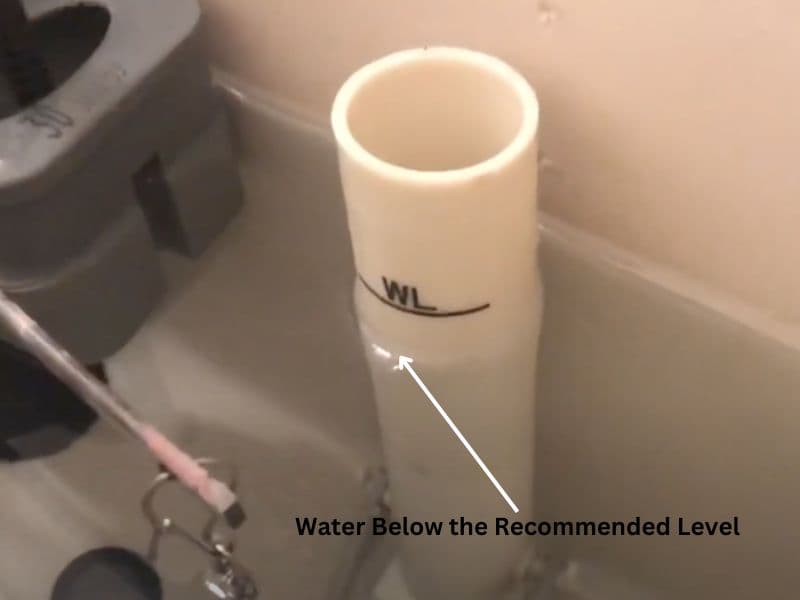
Increase the Water Level in the Cistern
The water level in the cistern is an essential component in the water pressure after flushing your toilet. If there is low water in the cistern, your toilet won’t flush well.
First, take out the cistern lid and look inside. All new cisterns have a calibrated mark within their inner surface to show you the optimum water level for ideal flushing power.
Generally, this should be slightly below the overflow tube edge to avoid water draining into the overflow tube, which can make the toilet and wastewater continually run.
If you discover a lower water level, then you have an answer to this problem. You can easily adjust your water cistern floating assembly. The water-floating assemblies can include a ball float or cup float, performing similar functions.
The floater’s lever should be on the water surface for turning on and off the fill valve, depending on the water level in the cistern.
To ease in adjusting your cup float, you must ensure that your cistern is empty. You can empty your cistern tank by:
- Turning off the shutoff valve to prevent water from entering the cistern.
- Removing the cistern lid.
- Flushing the toilet to ensure the cistern drains out all water.
After your cistern is empty, you can then adjust the ball float using the following steps:
- Nab the clip that attaches the cup float to the fill valve shank and shifts the ball float upwards to raise the water level.
- Ensure that the optimal mark level on the cup float is slightly an inch above the upper edge of the overflow valve.
- Allow water to flow in by turning on the shutoff valve.
- Check the water level to ensure it is at the required height.
- Flush your toilet to determine whether it flushes stronger or better.
This adjusting process is a little less complicated if your toilet has a ball float. You can easily adjust with your water on and the cistern containing water. The ball float’s height is adjusted by regulating the screw within the top of the fill valve.
This adjustment alters the tension in the arm, raising the float to increase the water level. Flush the toilet and control the flush power. The flush power should improve with a higher water level in the cistern.
At times, the cause for low water levels in the toilet tank is a clogged drain vent pipe. The pressure imbalance in the toilet pipes leads to poor flushing and might prevent the water from filling the tank. You should then unclog the drain vent pipe to restore the toilet’s normal functioning.
Clean the Toilet Bowl Flush Holes
The toilet bowl flush holes are situated within the toilet bowl’s rim. When you flush the toilet, water pours through these holes, which can be easily blocked with mineral deposits from hard water.
If the flush holes are clogged, there will be a decrease in the flushing water pressure. Thus, getting rid of mineral deposits can enhance the flush power.
To clean the toilet’s flush holes, follow these steps:
- Empty water from the cistern and the toilet bowl by flushing it. Before flushing your toilet, turn off the water supply and ensure the cistern empties.
- After the cistern is empty, allow the toilet bowl to dry, or use a rag to dry the bowl’s surface and flush holes.
- Next, use strong waterproof duct tape to cover all the flush holes to prevent water from leaking.
- After tapping off these holes, pour about a gallon of water mixed with vinegar into the cistern. Flush your toilet and check whether the duct tape is intact with the flush holes.
- Wait for about an hour for the vinegar to act on the clogged surfaces, but you can allow it to stay longer if your toilet remains unused.
- After the vinegar has acted on the surface, remove the duct tape, allow water to pass through it, and flush your toilet multiple times to clear the vinegar. The flush holes should unblock and increase the flush power.
You can also use a bristled wire brush to eliminate all stubborn mineral deposits that may have remained.
This method is a quick maintenance cleaning approach that you can practice once annually to ensure minimum mineral buildups and maintain optimum flushing power.
Unblock the Valves
The main valve is generally the main component that allows water into the cistern. This valve can also block due to a dysfunctional floater or buildup of sediments.
However, you can easily unblock these valves using an anti-rust solvent to erode all sediments that may be blocking the valves. If you have a dysfunctional floater system, you can identify the defective parts and fix or replace them.
If either of the two processes doesn’t work, you can alternatively replace the affordable floater and valve components.
Tighten or Loosen the Flapper
A loose chain or wire connecting the flapper to the flushing lever won’t produce enough flushing pressure. This is because it won’t create sufficient suction pressure. Similarly, it won’t have enough room to make the suction pressure when it’s too tight.
You can easily remedy this problem by loosening or tightening the chain to make the flapper acquire a new natural position. Ensure that it has a suitable tightness that can cause an immediate effect when pulling the lever.
If this method doesn’t work for you, you’ll need to replace old or worn-out faulty flappers.
Remove Water from the Floater
A floater may contain water due to a loose connection with the floating lever. If this happens, unfasten it from the lever, pour out all water and fasten it to the lever. You can use sealing tape to acquire better firmness if it’s loose.
However, if the floater has a puncture on its surface, you can consider using a sealant or replacing it with a new one.
Unblock the Pipes
If the pipes distributing water to the toilet tank are blocked, you’ll need to solve the problem from the tank supplying water to your toilet. Use a suitable anti-rust solvent to remove all sediments by pouring them through the pipes. Later, allow water to pass through them.
For the other parts of the drainage system or toilet bowl, pour in the bleach and wait for about 30 minutes. The bleach cleans the drainage system by getting rid of all sediments present. After 30 minutes, flush the toilet.
You can try this method multiple times after a few weeks to completely eliminate the sediments.
If none of these methods work, consider replacing your toilet in its enirety. As you do so, adhere to the toilet placement guidelines at all times.
Bottom Line
Low toilet flush power shouldn’t stress you. You can easily try any of the abovementioned methods to increase toilet flush power. Each method is easy to handle, affordable, and will save the extra bucks you may spend calling an expert. Therefore, attempt any of these methods to increase your toilet flush power, depending on the cause of the problem.
You can also opt for vault toilets that don’t have many parts that may lead to clogs and the need for a sewer line. While they, too, can get poor flushing problems, they have less to deal with.